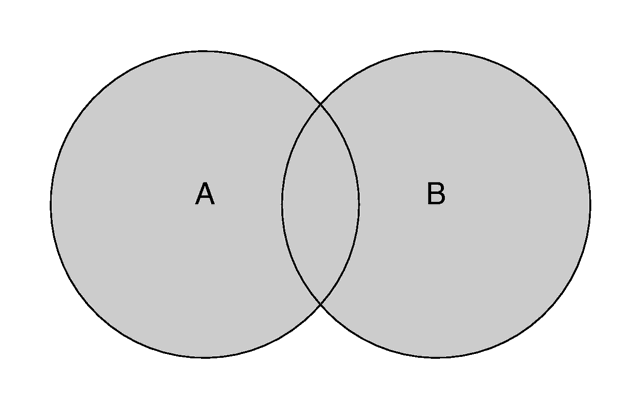
The union of two objects.
Note that the difference operation is performed by intersecting the first object with the negation of the second object.

Unions are simply glue used to bind two or more shapes into a single entity that can be manipulated as a single object. The image above shows the union of A and B. The new object created by the union operation can be scaled, translated and rotated as a single shape. The entire union can share a single texture but each object contained in the union may also have its own texture, which will override any matching texture statements in the parent object.
You should be aware that the surfaces inside the union will not be removed. As you can see from the figure this may be a problem for transparent unions. If you want those surfaces to be removed you'll have to use the merge operations explained in a later section.
The following union will contain a box and a sphere.
Earlier versions of POV-Ray placed restrictions on unions so you often had to combine objects with composite statements. Those earlier restrictions have been lifted so composite is no longer needed. Composite is still supported for backwards compatibility but it is recommended that union is now used in it's place since future support for the composite keyword is not guaranteed.
For example:
The results is a subtraction of the 2nd shape from the first shape as shown in the figure below.
For example:
The merge operations can be used to avoid this problem. It works just like union but it eliminates the inner surfaces like shown in the figure below.
The different types of light sources and the optional modifiers are described in the following sections.
The other keywords will be explained later.
The spotlight is identified by the spotlight keyword. It is located at LOCATION and points at POINT_AT. The following illustration will be helpful in understanding how these values relate to each other.
The spotlight's other parameters are radius, falloff and tightness.
Think of a spotlight as two nested cones as shown in the figure. The inner cone is specified by the radius parameter and is fully lit. The outer cone is the falloff cone beyond which there is no light. The values for these two parameters are half the opening angles of the corresponding cones, both angles have to be smaller than 90 degrees. The light smoothly falls off between the radius and the falloff angle like shown in the figures below (as long as the radius angle is not negative).
The tightness value specifies how quickly the light dims, or falls off, from the spotlight's center line to the falloff cone (full darkness outside). The default value for tightness is 10. Lower tightness values will make the spotlight brighter, making the spot wider and the edges sharper. Higher values will dim the spotlight, making the spot tighter and the edges softer. Values from 1 to 100 are acceptable.
You should note from the figures that the radius and falloff angles interact with the tightness parameter. Only negative radius angles will give the tightness value full control over the spotlight's appearance as you can see from the figure below. In that case the falloff angle has no effect and the lit area is only determined by the tightness parameter.
Spotlights may be used anyplace that a normal light source is used. Like any light sources, they are invisible. They are treated as shapes and may be included in CSG shapes. They may also be used in conjunction with area lights.
The radius, falloff and tightness keywords control the same features as with the spotlight.
You should keep in mind that the cylindrical light source is still a point light source. The rays are emitted from one point and are only constraint by a cylinder. The light rays are not parallel.
The area lights used in POV-Ray are rectangular in shape, sort of like a flat panel light. Rather than performing the complex calculations that would be required to model a true area light, it is approximated as an array of point light sources spread out over the area occupied by the light. The intensity of each individual point light in the array is dimmed so that the total amount of light emitted by the light is equal to the light color specified in the declaration. The syntax is:
The light's location and color are specified in the same way as a for a regular light source.
The area_light command defines the size and orientation of the area light as well as the number of lights in the light source array. The vectors AXIS1 and AXIS2 specify the lengths and directions of the edges of the light. Since the area lights are rectangular in shape these vectors should be perpendicular to each other. The larger the size of the light the thicker the soft part of shadows will be. The numbers SIZE1 and SIZE2 specify the dimensions of the array of point lights. The more lights you use the smoother your shadows will be but the longer they will take to render.
The jitter command is optional. When used it causes the positions of the point lights in the array to be randomly jittered to eliminate any shadow banding that may occur. The jittering is completely random from render to render and should not be used when generating animations.
Note that it is possible to specify spotlight parameters along with the area light parameters to create area spotlights. Using area spotlights is a good way to speed up scenes that use area lights since you can confine the lengthy soft shadow calculations to only the parts of your scene that need them.
An interesting effect can be created using a linear light source. Rather than having a rectangular shape, a linear light stretches along a line sort of like a thin fluorescent tube. To create a linear light just create an area light with one of the array dimensions set to 1.
The adaptive command is used to enable adaptive sampling of the light source. By default POV-Ray calculates the amount of light that reaches a surface from an area light by shooting a test ray at every point light within the array. As you can imagine this is very slow. Adaptive sampling on the other hand attempts to approximate the same calculation by using a minimum number of test rays. The number specified after the keyword controls how much adaptive sampling is used. The higher the number the more accurate your shadows will be but the longer they will take to render. If you're not sure what value to use a good starting point is adaptive 1. The adaptive keyword only accepts integer values and cannot be set lower than 0.
When performing adaptive sampling POV-Ray starts by shooting a test ray at each of the four corners of the area light. If the amount of light received from all four corners is approximately the same then the area light is assumed to be either fully in view or fully blocked. The light intensity is then calculated as the average intensity of the light received from the four corners. However, if the light intensity from the four corners differs significantly then the area light is partially blocked. The area light is split into four quarters and each section is sampled as described above. This allows POV-Ray to rapidly approximate how much of the area light is in view without having to shoot a test ray at every light in the array. Visually the sampling goes like shown below.
While the adaptive sampling method is fast (relatively speaking) it can sometimes produces inaccurate shadows. The solution is to reduce the amount of adaptive sampling without completely turning it off. The number after the adaptive keyword adjusts the number of times that the area light will be split before the adaptive phase begins. For example if you use adaptive 0 a minimum of 4 rays will be shot at the light. If you use adaptive 1 a minimum of 9 rays will be shot (adaptive 2 gives 25 rays, adaptive 3 gives 81 rays, etc). Obviously the more shadow rays you shoot the slower the rendering will be so you should use the lowest value that gives acceptable results.
The number of rays never exceeds the values you specify for rows and columns of points. For example area_light x,y,4,4 specifies a 4 by 4 array of lights. If you specify adaptive 3 it would mean that you should start with a 9 by 9 array. In this case no adaptive sampling is done. The 4 by 4 array is used.
There is an implied no_shadow attached to the looks_like object so that light is not blocked by the object. Without the automatic no_shadow the light inside the object would not escape. The object would, in effect, cast a shadow over everything.
If you want the attached object to block light then you should attach it with a union and not a looks_like as follows:
Presumably parts of the lamp shade are translucent to let some light out.
The fade_distance keyword is used to specify the distance at which the full light intensity arrives, i. e. the intensity which was given by the color keyword. The actual attenuation is described by the fade_power keyword, which determines the falloff rate. E. g. linear or quadratic falloff can be used by setting FADE_POWER to 1 or 2 respectively. The complete formula to calculate the factor by which the light is attenuated is
with d being the distance the light has traveled.
You should note two important facts: First, for FADE_DISTANCEs larger than one the light intensity at distances smaller than FADE_DISTANCE actually increases. This is necessary to get the light source color if the distance traveled equals the FADE_DISTANCE. Second, only light coming directly from light sources is attenuated. Reflected or refracted light is not attenuated by distance.
Section 7.5.5.5
Intersection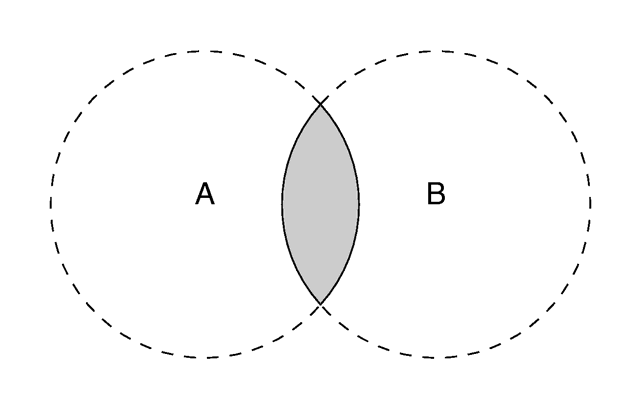
The intersection of two objects.
Section 7.5.5.6
Difference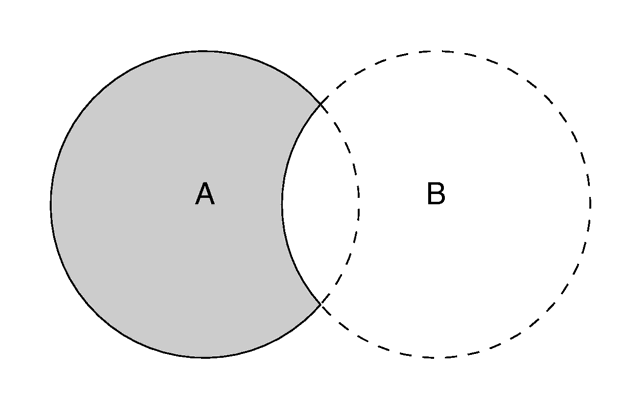
The difference between two objects.
Section 7.5.5.7
Merge
Merge removes inner surfaces.
Section 7.5.6
Light Sources
Section 7.5.6.1
Point Lights
Section 7.5.6.2
Spotlights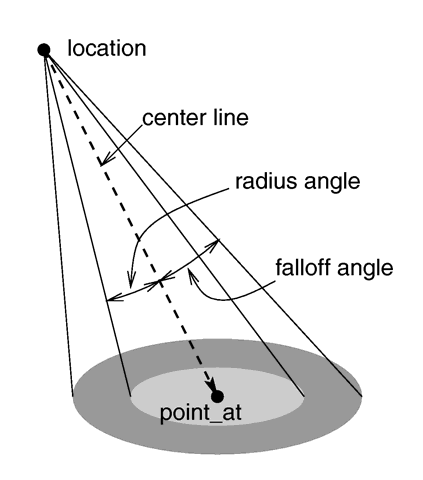
The geometry of a spotlight.
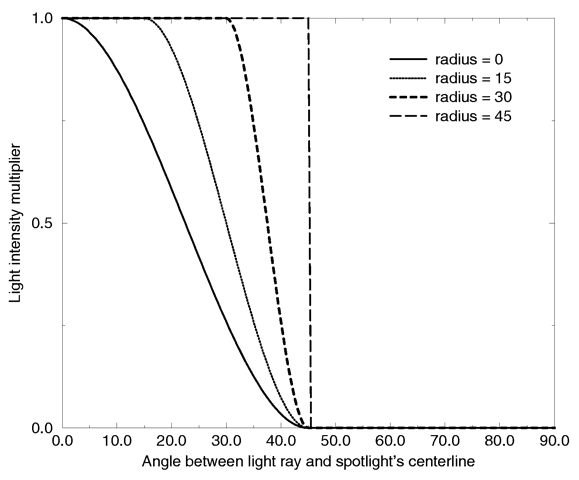
Intensity multiplier curve with a fixed falloff angle of 45 degrees.
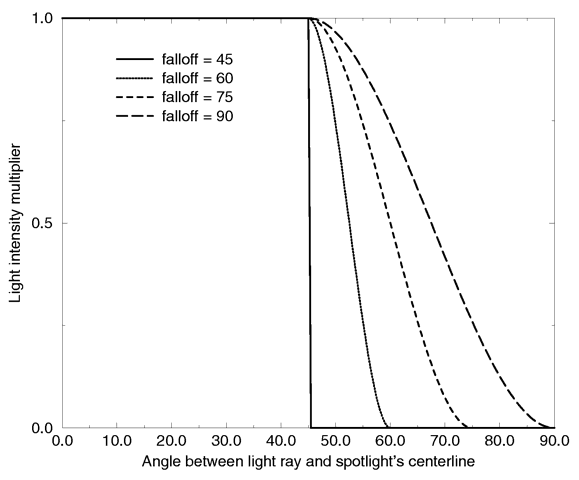
Intensity multiplier curve with a fixed radius angle of 45 degrees.
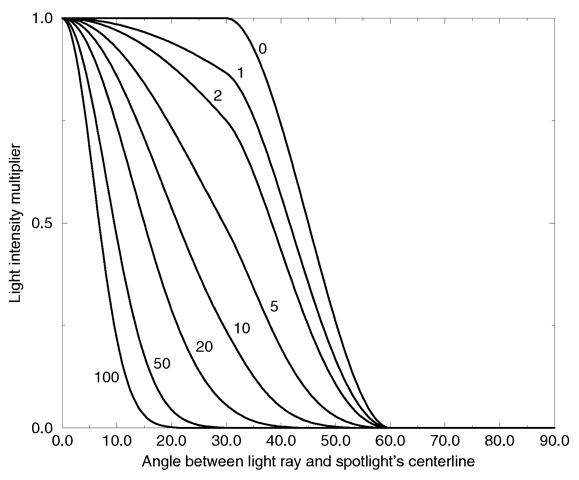
Intensity multiplier curve with fixed angle and falloff angles of 30 and 60 degrees respectively and different tightness values.
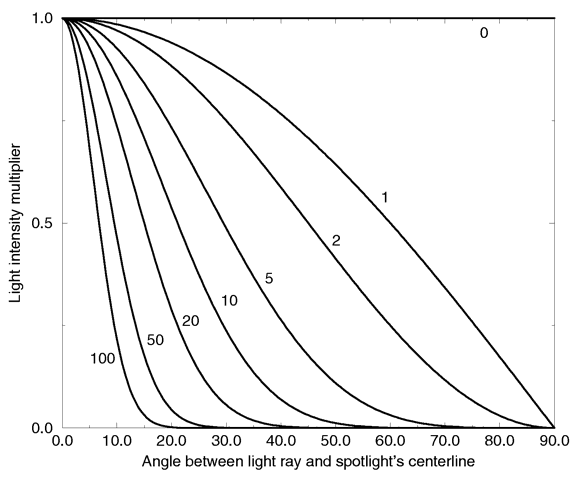
Intensity multiplier curve with a negative radius angle and different tightness values.
Section 7.5.6.3
Cylindrical Lights
Section 7.5.6.4
Area Lights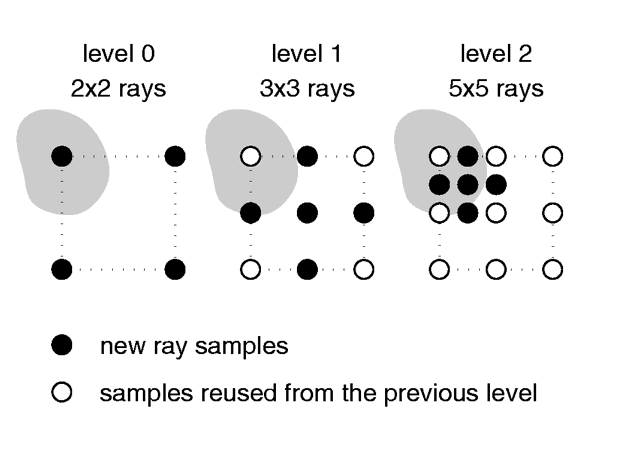
Area light adaptive samples.
Section 7.5.6.5
Shadowless Lights
Section 7.5.6.6
Looks_like
Section 7.5.6.7
Light Fading
                                 2
  attenuation = --------------------------------------
                 1 + (d / FADE_DISTANCE) ^ FADE_POWER
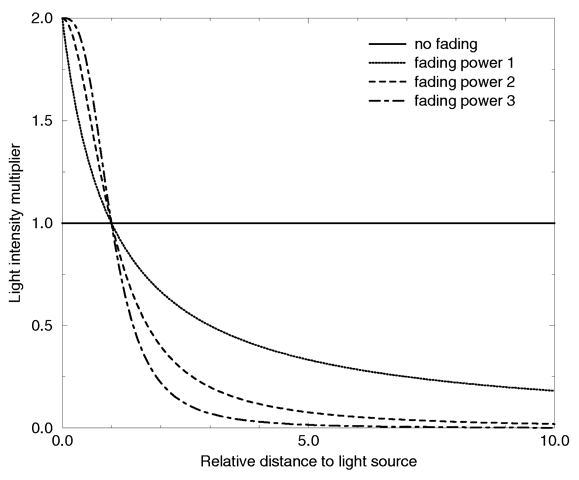
Light fading functions for different fading powers.
Table Of Contents