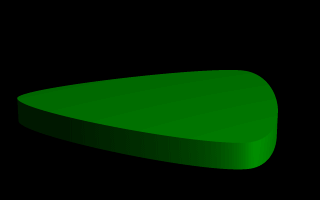
A cubic, triangular prism shape.
There is just one catch, and we should read this section carefully to keep from tearing our hair out over mysterious too few points in prism messages which keep our prism from rendering. We can probably guess where this is heading: how to close a non-linear spline. Unlike the linear spline, which simply draws a line between the last and first points if we forget to make the last point equal to the first, quadratic and cubic splines are a little more fussy.
First of all, we remember that quadratic splines determine the equation of the curve which connects any two points based on those two points and the previous point, so the first point in any quadratic spline is just a control point and won't actually be part of the curve. What this means is: when we make our shape out of a quadratic spline, we must match the second point to the last, since the first point is not on the curve - it's just a control point needed for computational purposes.
Likewise, cubic splines need both the first and last points to be control points, therefore, to close a shape made with a cubic spline, we must match the second point to the second from last point. If we don't match the correct points on a quadratic or cubic shape, that's when we will get the too few points in prism error. POV-Ray is still waiting for us to close the shape, and when it runs out of points without seeing the closure, an error is issued.
Confused? Okay, how about an example? We replace the prism in our last bit of code with this one (see file prismdm2.pov).

This simple prism produces what looks like an extruded triangle with its corners sanded smoothly off. Points two, three and four are the corners of the triangle and point five closes the shape by returning to the location of point two. As for points one and six, they are our control points, and aren't part of the shape - they're just there to help compute what curves to use between the other points.
To put this more generally, if we want a smooth closure on a cubic spline, we make the first control point equal to the third from last point, and the last control point equal to the third point. On a quadratic spline, the trick is similar, but since only the first point is a control point, make that equal to the second from last point.
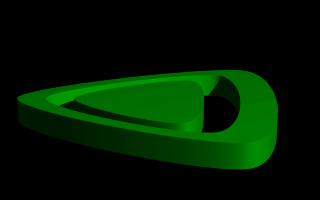
For readability purposes, we have started a new line every time we moved on to a new sub-shape, but the ray-tracer of course tells where each shape ends based on whether the shape has been closed (as described earlier). We render this new prism, and look what we've got. It's the same familiar shape, but it now looks like a smaller version of the shape has been carved out of the center, then the carved piece was sanded down even smaller and set back in the hole.
Simply, the outer rim is where only sub-shape one exists, then the carved out part is where sub-shapes one and two overlap. In the extreme center, the object reappears because sub-shapes one, two, and three overlap, returning us to an odd number of overlapping pieces. Using this technique we could make any number of extremely complex prism shapes!
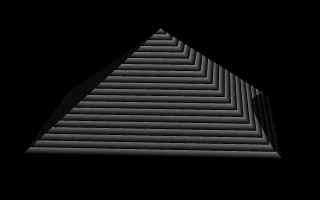
The gradient pigment was selected to give some definition to our object without having to fix the lights and the camera angle right at this moment, but when we render it, we what we've created? A horizontally striped pyramid! By now we can recognize the linear spline connecting the four points of a square, and the familiar final point which is there to close the spline.
Notice all the transformations in the object declaration. That's going to take a little explanation. The rotate and translate are easy. Normally, a conic sweep starts full sized at the top, and tapers to a point at y=0, but of course that would be upside down if we're making a pyramid. So we flip the shape around the x-axis to put it rightside up, then since we actually orbitted around the point, we translate back up to put it in the same position it was in when we started.
The scale is to put the proportions right for this example. The base is eight units by eight units, but the height (from y=1 to y=0) is only one unit, so we've stretched it out a little. At this point, we're probably thinking, "why not just sweep up from y=0 to y=4 and avoid this whole scaling thing?"
That is a very important gotcha! with conic sweeps. To see what's wrong with that, let's try and put it into practice (see file prismdm6.pov). We must make sure to remove the scale statement, and then replace the line which reads
This sets the second height at y=4, so let's re-render and see if the effect is the same.
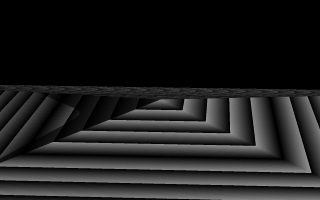
Whoa! Our height is correct, but our pyramid's base is now huge! What went wrong here? Simple. The base, as we described it with the points we used actually occurs at y=1 no matter what we set the second height for. But if we do set the second height higher than one, once the sweep passes y=1, it keeps expanding outward along the same lines as it followed to our original base, making the actual base bigger and bigger as it goes.
To avoid losing control of a conic sweep prism, it is usually best to let the second height stay at y=1, and use a scale statement to adjust the height from its unit size. This way we can always be sure the base's corners remain where we think they are.
That leads to one more interesting thing about conic sweeps. What if we for some reason don't want them to taper all the way to a point? What if instead of a complete pyramid, we want more of a ziggurat step? Easily done. After putting the second height back to one, and replacing our scale statment, we change the line which reads
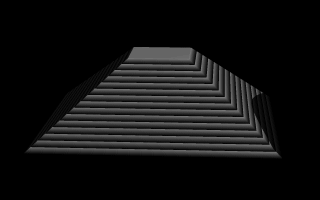
When we re-render, we see that the sweep stops short of going all the way to its point, giving us a pyramid without a cap. Exactly how much of the cap is cut off depends on how close the first height is to the second height.
Where r and n are float values greater than zero and less than or equal to one. Let's make a superellipsoid and experiment with the values of r and n to see what kind of shapes we can make.
We create a file called supellps.pov and edit it as follows:
The addition of a gray background makes it a little easier to see our object. We now type:
We save the file and trace it at 200x150 -A to see the shape. It will look like a box, but the edges will be rounded off. Now let's experiment with different values of r and n. For the next trace, try <1, 0.2>. The shape now looks like a cylinder, but the top edges are rounded. Now try <0.1, 1>. This shape is an odd one! We don't know exactly what to call it, but it is interesting. Finally, lets try <1, 1>. Well, this is more familiar... a sphere!
There are a couple of facts about superellipsoids we should know. First, we should not use a value of 0 for either r nor n. This will cause POV-Ray to incorrectly make a black box instead of our desired shape. Second, very small values of r and n may yield strange results so they should be avoided. Finally, the Sturmian root solver will not work with superellipsoids.
Superellipsoids are finite objects so they respond to auto-bounding and can be used in CSG.
Now let's use the superellipsoid to make something that would be useful in a scene. We will make a tiled floor and place a couple of superellipsoid objects hovering over it. We can start with the file we have already made.
We rename it to tiles.pov and edit it so that it reads as follows:
Note that we have added #include "textures.inc" so we can use pre-defined textures. Now we want to define the superellipsoid which will be our tile.
Superellipsoids are roughly 2*2*2 units unless we scale them otherwise. If we wish to lay a bunch of our tiles side by side, they will have to be offset from each other so they don't overlap. We should select an offset value that is slightly more than 2 so that we have some space between the tiles to fill with grout. So we now add this:
We now want to lay down a row of tiles. Each tile will be offset from the original by an ever-increasing amount in both the +z and -z directions. We refer to our offset and multiply by the tile's rank to determine the position of each tile in the row. We also union these tiles into a single object called Row like this:
This gives us a single row of 17 tiles, more than enough to fill the screen. Now we must make copies of the Row and translate them, again by the offset value, in both the +x and -x directions in ever increasing amounts in the same manner.
Finally, our tiles are complete. But we need a texture for them. To do this we union all of the Rows together and apply a White Marble pigment and a somewhat shiny reflective surface to it:
We now need to add the grout. This can simply be a white plane. We have stepped up the ambient here a little so it looks whiter.
To complete our scene, let's add five different superellipsoids, each a different color, so that they hover over our tiles and are reflected in them.
We trace the scene at 320x200 -A to see the result. If we are happy with that, we do a final trace at 640x480 +A0.2.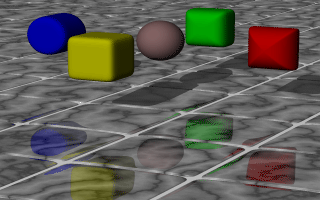
Some superellipsoids hovering above a tiled floor.
Table Of Contents