The threshold keyword determines the total field strength value that POV-Ray is looking for. By following the ray out into space and looking at how each blob component affects the ray, POV-Ray will find the points in space where the field strength is equal to the threshold value. The following list shows some things you should know about the threshold value.
Cylindrical components are specified by the keyword cylinder giving a cylinder formed by the base <END1>, the apex <END2> and the radius. The cylinder has hemispherical caps at the base and apex. Spherical components are specified by the keyword sphere forming a sphere at <CENTER> with the given radius. Each component can be individually translated, rotated, scaled and textured. The complete syntax for the cylindrical and spherical components is:
By unevenly scaling a spherical component you can create ellipsoidal components. The component keyword gives a spherical component and is only used for compatibility with earlier POV-Ray versions.
The strength parameter is a float value specifying the field strength at the center of the object. The strength may be positive or negative. A positive value will make that component attract other components while a negative value will make it repel other components. Components in different, separate blob shapes do not affect each other.
You should keep the following things in mind.
The components of each blob object are internally bounded by a spherical bounding hierarchy to speed up blob intersection tests and other operations. By using the optional keyword hierarchy you can switch this hierarchy off.
An example of a three component blob is:
If you have a single blob component then the surface you see will just look like the object used, i. e. a sphere or a cylinder, with the surface being somewhere inside the surface specified for the component. The exact surface location can be determined from the blob equation listed below (you will probably never need to know this, blobs are more for visual appeal than for exact modeling).
For the more mathematically minded, here's the formula used internally by POV-Ray to create blobs. You don't need to understand this to use blobs. The formula used for a single blob component is:
This formula has the nice property that it is exactly equal to the strength parameter at the center of the component and drops off to exactly 0 at a distance from the center of the component that is equal to the radius value. The density formula for more than one blob component is just the sum of the individual component densities:
The calculations for blobs must be very accurate. If this shape renders improperly you may add the keyword sturm after the last component to use POV-Ray's slower-yet-more-accurate Sturmian root solver.
Where <CORNER1> and <CORNER2> are vectors defining the x, y, z coordinates of the opposite corners of the box.
Note that all boxes are defined with their faces parallel to the coordinate axes. They may later be rotated to any orientation using the rotate keyword.
Each element of <CORNER1> should always be less than the corresponding element in <CORNER2>. If any elements of <CORNER1> are larger than <CORNER2> the box will not appear in the scene.
Boxes are calculated efficiently and make good bounding shapes (if manually bounding seems to be necessary).
Where <BASE_POINT> and < CAP_POINT> are vectors defining the x, y, z coordinates of the center of the cone's base and cap and BASE_RADIUS and CAP_RADIUS are float values for the corresponding radii.
Normally the ends of a cone are closed by flat planes which are parallel to each other and perpendicular to the length of the cone. Adding the optional keyword open after CAP_RADIUS will remove the end caps and results in a tapered hollow tube like a megaphone or funnel.
Where <BASE_POINT> and < CAP_POINT> are vectors defining the x, y, z coordinates of the cylinder's base and cap and RADIUS is a float value for the radius.
Normally the ends of a cylinder are closed by flat planes which are parallel to each other and perpendicular to the length of the cylinder. Adding the optional keyword open after the radius will remove the end caps and results in a hollow tube.
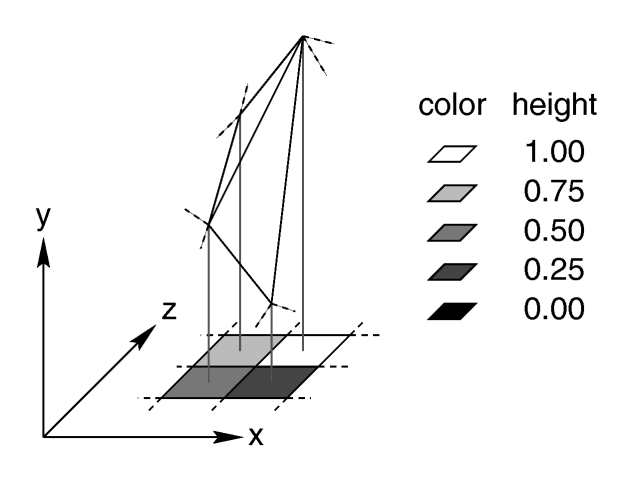
A height field is essentially a one unit wide by one unit long square with a mountainous surface on top. The height of the mountain at each point is taken from the color number or palette index of the pixels in a graphic image file. The maximum height is one, which corresponds to the maximum possible color or palette index value in the image file.
The mesh of triangles corresponds directly to the pixels in the image file. Each square formed by four neighboring pixels is divided into two triangles. An image with a resolution of N*M pixels has (N-1)*(M-1) squares that are divided into 2*(N-1)*(M-1) triangles.
The resolution of the height field is influenced by two factors: the resolution of the image and the resolution of the color/index values. The size of the image determines the resolution in the x- and z-direction. A larger image uses more triangles and looks smoother. The resolution of the color/index value determines the resolution along the y-axis. A height field made from an 8 bit image can have 256 different height levels while one made from a 16 bit image can have up to 65536 different height levels. Thus the second height field will look much smoother in the y-direction if the height field is created appropriately.
The size/resolution of the image does not affect the size of the height field. The un-scaled height field size will always be 1* 1. Higher resolution image files will create smaller triangles, not larger height fields.
There are six or possibly seven types of files which can define a heightfield, as follows:
The image file used to create a height field can be a GIF, TGA, POT, PNG, PGM, PPM and possibly a system specific (e. g. Windows BMP or Macintosh Pict) format file. The GIF, PNG, PGM and possibly system format files are the only ones that can be created using a standard paint program. Though there are paint programs for creating TGA image files they won't be of much use for creating the special 16 bit TGA files used by POV-Ray (see below and "HF_Gray_16" for more details).
In an image file like GIF that uses a color palette the color number is the palette index at a given pixel. Use a paint program to look at the palette of a GIF image. The first color is palette index zero, the second is index one, the third is index two and so on. The last palette entry is index 255. Portions of the image that use low palette entries will result in lower parts of the height field. Portions of the image that use higher palette entries will result in higher parts of the height field.
Height fields created from GIF files can only have 256 different height levels because the maximum number of colors in a GIF file is 256.
The color of the palette entry does not affect the height of the pixel. Color entry 0 could be red, blue, black or orange but the height of any pixel that uses color entry 0 will always be 0. Color entry 255 could be indigo, hot pink, white or sky blue but the height of any pixel that uses color entry 255 will always be 1.
You can create height field GIF images with a paint program or a fractal program like Fractint. You can usually get Fractint from most of the same sources as POV-Ray.
A POT file is essentially a GIF file with a 16 bit palette. The maximum number of colors in a POT file is 65536. This means a POT height field can have up to 65536 possible height values. This makes it possible to have much smoother height fields. Note that the maximum height of the field is still 1 even though more intermediate values are possible.
At the time of this writing the only program that created POT files was a freeware IBM-PC program called Fractint. POT files generated with this fractal program create fantastic landscapes.
The TGA and PPM file formats may be used as a storage device for 16 bit numbers rather than an image file. These formats use the red and green bytes of each pixel to store the high and low bytes of a height value. These files are as smooth as POT files but they must be generated with special custom-made programs. Several programs can create TGA heightfields in the format POV uses, such as gforge and Terrain Maker.
PNG format heightfields are usually stored in the form of a grayscale image with black corresponding to lower and white to higher parts of the height field. Because PNG files can store up to 16 bits in grayscale images they will be as smooth as TGA and PPM images. Since they are grayscale images you will be able to view them with a regular image viewer. gforge can create 16-bit heightfields in PNG format. Color PNG images will be used in the same way as TGA and PPM images.
SYS format is a platform specific file format. See your platform specific documentation for details.
An optional water_level parameter may be added after the file name. It consists of the keyword water_level followed by a float value telling the program to ignore parts of the height field below that value. The default value is zero and legal values are between zero and one. For example water_level .5 tells POV-Ray to only render the top half of the height field. The other half is below the water and couldn't be seen anyway. This term comes from the popular use of height fields to render landscapes. A height field would be used to create islands and another shape would be used to simulate water around the islands. A large portion of the height field would be obscured by the water so the water_level parameter was introduced to allow the ray-tracer to ignore the unseen parts of the height field. water_level is also used to cut away unwanted lower values in a height field. For example if you have an image of a fractal on a solid colored background, where the background color is palette entry 0, you can remove the background in the height field by specifying, water_level .001.
Normally height fields have a rough, jagged look because they are made of lots of flat triangles. Adding the keyword smooth causes POV-Ray to modify the surface normal vectors of the triangles in such a way that the lighting and shading of the triangles will give a smooth look. This may allow you to use a lower resolution file for your height field than would otherwise be needed. However, smooth triangles will take longer to render.
In order to speed up the intersection tests an one-level bounding hierarchy is available. By default it is always used but it can be switched off to eventually improve the rendering speed for small height fields (i. e. low resolution images).1) The threshold value must be positive. 2) A component disappears if the threshold value is greater than its strength. 3) As the threshold value gets larger the surface you see gets closer to the centers of the components. 4) As the threshold value gets smaller, the surface you see gets closer to the surface of the components. 1) The strength value may be positive or negative. Zero is a bad value, as the net result is that no field was added --- you might just as well have not used this component. 2) If strength is positive, then POV-Ray will add the component's field to the space around the center of the component. If this adds enough field strength to be greater than the "threshold" value you will see a surface. 3) If the strength value is negative, then POV-Ray will subtract the component's field from the space around the center of the component. This will only do something if there happen to be positive components nearby. What happens is that the surface around any nearby positive components will be dented away from the center of the negative component.
Section 7.5.2.2
Box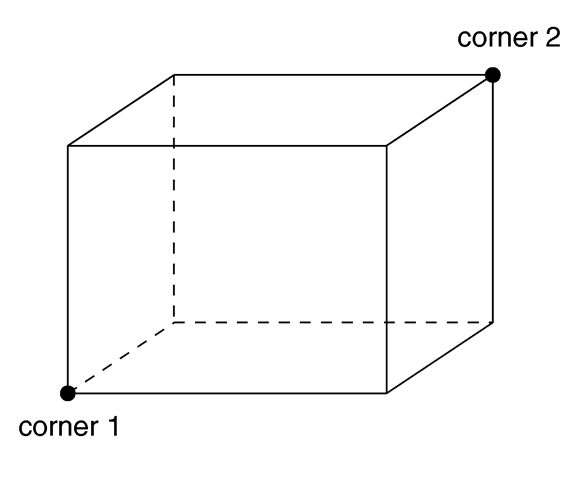
The geometry of a box.
Section 7.5.2.3
Cone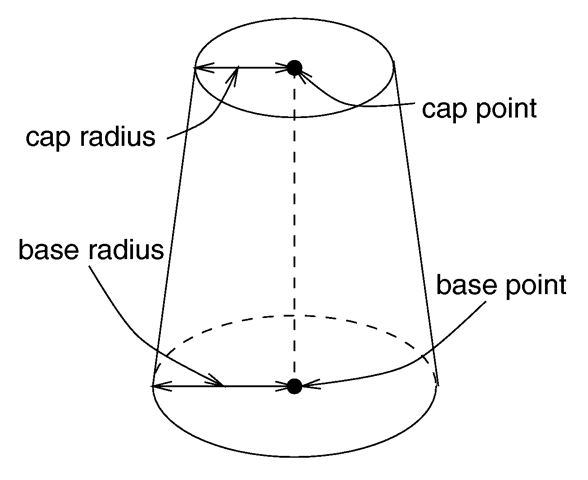
The geometry of a cone.
Section 7.5.2.4
Cylinder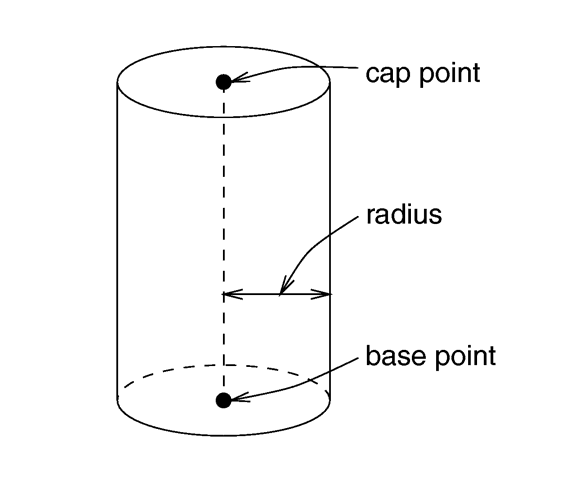
The geometry of a cylinder.
Section 7.5.2.5
Height Field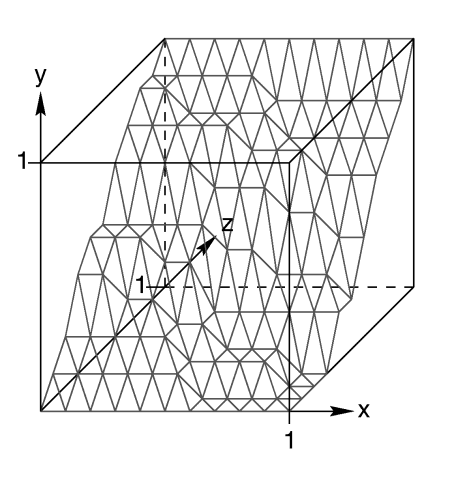
The size and orientation of an un-scaled height field.
Four pixels of an image and the resulting heights and triangles in the height field.
Table Of Contents